Task 2 - Scheduling Medical Appointments
Note: If you have not completed the training tutorial for the eClaims scheduler you should do so prior to completing this task. There are further instructions in the Introduction of the learning resources on how to make/schedule appointments using the eClaims program.
Activity
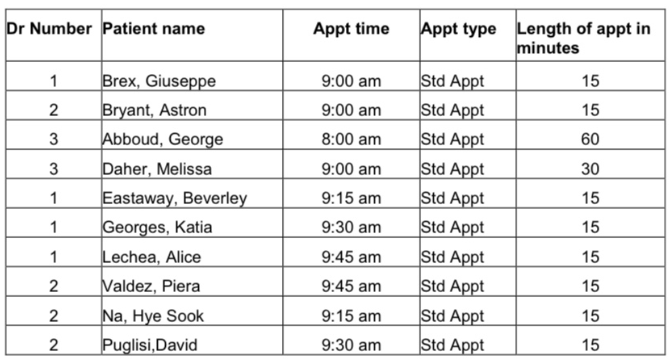
Using the eClaims Scheduler, enter the following patient appointments under the appropriate Doctor number. It will be necessary to take a screenshot of each appointment made and insert the image into a Word Document. See instructions below on how to screenshot
Ignore the prompt that the Medicare Number has expired.
Instructions on taking a screen shot:
• Hold down the Alt key and press print screen on your computer keyboard Open a new Word document and either select paste or ctrl V.
• Save and print a copy - call it Appointment scheduler Assignment 1.
• Now print a copy of each doctor's appointments directly from eClaims. Note that your cursor must be in each doctor's patient list (column) before printing. Each doctor's list must be printed separately.
• Instructions on printing from eClaims:
• Select the print button from the menu at the bottom of the screen Select Scheduler listing (click in the box)
• Select insert a blank line
• Leave output to screen and press ok
• Select the print icon from the print preview menu at the top of the screen Check your print out to ensure it is accurate
Students succeed in their courses by connecting and communicating with an expert until they receive help on their questions

Consult our trusted tutors.


 Login | Sign Up

